Clay - Heat - smoke:
alternative Firing techniques
1st Day of Class Preparations
Images
Tagged books with my favorite images to share.
Glaze recipes
I was more interested in the use of organics and easy chemicals as naked glazes when researching before class started. I did not record any recipes during my research. I figured if I’m interested in those techniques later, I will have the books for reference. Instead of providing “glaze recipes” at class I was prepared to discuss organics (seaweed, banana peels both dried and wet, etc.) and chemicals (wires, Miracle Gro, salts, etc.).
Firing techniques
I have some, but not a ton, of experience with raku, horsehair, and pit firings. I was prepared to discuss my limited knowledge of those at the beginning of class.
Research from Suggested Readings
“Sawdust Firing” By Karin Hessenberg
Burnishing is important for fire pits and saggars.
-Allow for fire and fumes to be accepted into clay more dramatically.
Seaweed can be used for flashing.
Fuming
-Adding materials to the sawdust, NOT pots
---Iron wire will create orange-rust.
---Copper wire will create black or white lines.
---Masking tape will create feather or leaf-like effects.
---Steel wool will create rust-coloring marks if it touches the clay and peach marks if it is near the clay.
“Naked Clay” By Jane Perryman
Rubbing oxides into bisquesd pots will add color.
Using salt in between pots when stacking for firing will create interesting affects.
David Roberts
-Sprayed bisque surface with thick slip, applied a raku glaze, scratched a design through the glaze and slip. He raku fired to withdraw at 1562 degrees. After 20 seconds of cool air, the crackle develops. He reduced the pot in a chamber with sawdust (carbonization). After the withdrawal the glaze peels off reveling smoke marks.
Copper wire and steel wool wrapped around pots can be used in a saggar with sawdust, leaves, straw.
Resists
-Paper, wax, clay slip.
Etching techniques
-Thermal versus vinegar. Vinegar etching- vinegar is painted onto a dry surface to achieve volcanic look. The author didn’t note what “dry” meant… bisqued? Glazed?
**Goal for naked glazes
-“Desired result is timeless mystery… the pot has had a long life of its own”
Wrap pieces in damp newspaper. Then sprinkle with salt and copper.
Apply terra sigillata to bisqueware, it peels off in the fire.
-The surface can be scraped and stripped to expose veins.
Put 8% fiber in clay, which burns off, to create hairline fractures in the clay body.
Vinegar can be added to slip.
-It helps prevent cracking coils.
“Raku, Pit, and Barrel” By Anderson Turner
Spray pot taken out of kiln during raku with compressed air to cause glazed surface to quickly cool and contract.
-Encourages crackle.
Smoke 1 hour in reduction chamber to encourage dark black for raku.
Peel away slip can be used as a resist.
Horsehair (tail) should be used for horsehair firings.
-Fire to 1500 degrees. Withdraw pots at 900 degrees to draw with hair, feathers, etc. Once pots cool to 800 degrees the process is finished.
Wrapping raku pots so it melts into the glaze
-Bisque. Then wrap pot with copper wire (32, 26 gauge).
-Wrap tightly towards pot. Avoid getting too close to the bottom because of “foot melt.”
-Glaze over the wire thickly so that the copper will melt into the glaze.
-Fire.
Raku combustibles key (using a copper glaze)
-Leaves= higher oxygen level which causes coppers to go green
-Newspaper= lower oxygen level which causes reds in coppers
--*Pam prefers the slick newspapers for cool affects.
-Sawdust= lower oxygen which causes speckles of black and speckled texture.
-Grass clippings= slow burning so it slowly used oxygen. It is very smoky, thick and heavy.
-Spray piece taken out of kiln (during raku) with compressed air to cause glazed surface to quickly cool and contract, encouraging crackle.
Not good for super thick, think, or uneven pots OR wide platters.
-Smoke 1 hour to encourage dark black on reduction process of raku.
-Peel away slip
Paint onto bisque ware. Put in fire while still wet. Will resist the smoke. Slip will peel away after the firing.
-Drying tiles
Cover with plastic, then place light sandbags “strategically” to keep pieces flat while drying.
Once leather hard, turn tiles over and recover with plastic to dry slowly.
-Galleries will often put vessels in windows to bring people in, but wall pieces out sell vessels 2:1.
People have more wall space than sculpture space in their homes.
-Burnishing technique on the wheel.
Use stone on the pot, which is on the wheel.
Moisten bone-dry clay pot with water, then burnish until smooth.
Apply thing coating of olive oil and repeat.
-Pit firing key
Aquarium salt, baking soda, Epsom salts, Ice-melt, trisodium phosphate= yellow-orange colors
Banana peels= peach colors
Coffee grounds= vivid orange colors
*Salt and copper sulfate work best, but organics don’t flux or stick to pots.
-Saggar (non-traditional)
Wrap copper scrub pads around pot, holding wire in place with hot glue.
Can cover vessels in copper wire with slabs of paper clay around the pot to act like a saggar, trapping vaporizing copper next to the surface.
-Saggar (traditional)
Add copper sulfate, then copper-wire wrapped pots, peanut shells, cotton balls, rock salts to the pot.
Cover all of this with an inverted ceramic bowl.
Pit fires
16” deep= shallower pits produce brighter colors
Can go as deep as 4’.
-Indian potters
Stick pots carefully on grates above fire, surrounding and covering the stack with pot shards and sheets of metal.
Once the fire is hot enough, smother the fire with a mound of soil or ash.
VERSUS
-Barrel firing
Layer of newspaper, sawdust, and wood scraps on bottom of a trash can.
Add bricks to elevate a BBQ grill over the pile of combustibles.
Put pots on the grill. Each pot is covered with coffee cans or popcorn tins with holes punched in the cans to allow for smoke.
Build the fire around and under the coffee cans with newspaper for kindling.
Cover the trash can to create reduction.
*Damp sawdust may promote the development of silvery black surface3 instead of plain ebony black.
-Slow drying is essential requirement for forms to be slipped/burnished.
-Barrel-fire work
Have enough hot embers to burn all the combustibles.
Copper sulfate (Miracle Gro) =leaves deep maroon to black lines where it touches the surface, shades of pink.
Salt wash, baking soda, seaweed= yellow and ochre blushes
Can also soak cheesecloth in salt solution and wrap it around vessel.
Can brush salt onto the bisque pot.
Red iron oxide, copper carbonate (Miracle Gro), coarse salt= earth tones from peach to rust.
-Can also fire a piece of low-fire glazed work for interesting effects.
-Don’t burn any pressure-treated lumber or sawdust. It is toxic.
-Pack a barrel just like a pit, not too dense because the embers need to stay burning.
Fill the space with crumpled newspaper and wood (small and large pieces) 12” below rim of container.
Don’t stack wood above the rim.
As wood burns, replace it. It is not uncommon to have to relight the firing.
Remove work and wash off with water and a soft cloth. Do not use abrasive or metal brushes.
Apply paste wax.
It deepens subtle colors.
Use a thin coat and let it dry 3-5 minutes before polishing with a soft cloth.
-Saggar (literally means “safeguard”)
Some saggars have small holes in it to help vent a little to prevent pressure from blowing the lid off.
Aluminum foil saggars
Fire in pit, barrel, or raku kiln.
Try commercial white and other light-colored underglazes.
Use masking tape to resist glaze—stripes are fun.
Copper sulfate is a powerful chemical only use rubber gloves.
Ferric chloride powerful etchant—use a respirator.
Apply wire and washes.
Lay down aluminum foil in crisscross pattern on the work surface and put the pot in the middle.
Use 2T of chemicals.
Wrap the pot in foil, don’t press the foil flat against the pot.
To check this, pick up the foil saggar and roll it in the air. It should shake like a rattle. If there is no sound, you’ve wrapped it too tight.
Once the foil starts to disintegrate, at the end of firing and holes are in the saggar—the firing is complete.
Sculptures created before class
- Several slab pieces with textures, created with white, low fire earthenware. They have been bisqued.
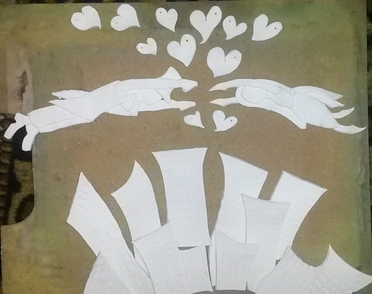
- 2 figures, the bride and groom, will fly towards each other above a city of curved skyscrapers. Where the 2 figures meet will be a burst of small, curved hearts.
- I intended to pit fire these pieces during the class. However, it will depend on how Pam feels about the work we created IN class and how long those pieces will take to fire. If I cannot pit fire them during the class, I will use acrylics and spray paints to apply color at home. The final piece will be wired to a willow frame with hardware cloth mesh. I plan to texture the hardware cloth with paper mache pulp and weavings with fabric and found objects. It will be a wedding present for a college friend.
- I did not pit fire these pieces in class. I will most likely not finish them before this journal is due. When I do finish it, I'll attach pictures and email Pam.
Sculptures created during class
#1. Tall, flat vase with curved sides.
- It was created with 2 smooth slabs for the “front” and “back.” The sides were slabs that had shredded burlap wedged into the clay. These soft slabs were used to match the curves of the flat pieces.
- Steel nails were pushed into the top lip of the vase.
- This is a new technique for me to use—creating a vessel out of clay mixed with fabric, not just applying fabric to the outside of the vessel. My research suggested using 8% fabric to cause hairline fractures in the clay. The burlap I used was shredded, however it wasn’t fine at all. It will be interesting as to how the piece will hold together. I can always “patch” or “wire” the holes together if the structure fails.
- I intend to pit fire this vessel. Pam suggested anything tall or wide would be licked by the huge flames of the fire. I will also use copper wire to wrap this vessel and perhaps encourage some of the holes created with the fabric. It will depend on how it looks after the bisque.
- The bisque was successful, but not as dramatic as I had hoped. The goal of incorporating the fabric into the clay body was to cause burn holes all the way through the walls of the vessel. This didn’t happen. However, the structure had great texture and stayed together! I used the copper sulfate wash on this entire vessel. I then wrapped 26 gauge copper wire all over the vessel in a crisscross pattern, held down to the pot with hot glue. I was very liberal with the glue, especially in the “joined” areas. I wrapped it with geometric and curvy patterns, weaving wire around the nails. I was really pleased with the successful pit firing of this pot. All sides look dramatic and accepted the firing well. I was surprised that more lines from the endless wiring didn’t show up. I used paste wax over the vessel to finish.
#2. Small vase made from 2 molds.
- It was created using 2 molds to make the “body” of the vessel. After placing the vessel on its seam, I opened the top to attach a neck. I also attached a foot (slightly larger than the neck) at the bottom.
- Textured (seashell) ribbons were attached to the joint of the neck and around the middle of the foot.
- I burnished the body heavily with a spoon and plastic bag. I attempted to burnish the neck and foot but I was super cautious as the vessel was past leather hard.
- This is a technique Pam introduced me to last year. I don’t have much practice with it and was look forward to using her molds at this class. I was happy with the body of the vessel, but I’m having trouble with symmetry on necks and feet.
- I intend to pit fire or saggar fire this piece. I hope to use some of the alternative methods I have researched. Perhaps seaweed, salts, oxides, slips to resist the smoke…
- The bisque was successful, but again surprised me. The burnished area didn’t shine, but it was smooth to the touch and pleasing to feel. I covered the entire vessel in copper sulfate wash. Very close to the firing, Kevin finished a banana and gave me the peel. The research I did noted using dry and wet combustibles for differing effects. I wrapped the peel around the vessel in a diagonal line and used copper wire to wrap hold the peel in place. I put the entire package in a tin foil saggar. The firing was successful. It is sort of difficult to tell where I placed the peel, I should’ve paid more attention when documenting my methods. I used paste wax over the entire vessel. The burnished area is really nice to touch. There is lovely contrast on this vessel between the soft, gray lines and sharp, black lines; the smooth, burnished texture and the rougher texture, the pale creams and the flashes of peach.
#3. Medium vase made from 2 molds.
- It was created using 2 molds to make the “body” of the vessel. After placing the vessel on its seam, I opened the top to attach a neck (slightly larger than the feet). I also attached 2 feet at the bottom.
- The feet and neck were textured slabs using a rolling tool that my table-mate, Abbie, suggested.
- Textured coils (same roller) were attached around the neck and feet joints.
- I burnished the body of the vessel with a plastic bag.
- I intend to raku or pit fire this piece. It is sort of whimsical looking and would suit a dramatic raku glazing well.
- The bisque was successful. However the burnished area remained unimpressive, even less than #2. I decided to raku this whimsical vessel using copper carbonate around the entire piece. I used the cobalt over the raised areas of the neck, feet, and ribbon details. The raku firing was successful. The glazes burned consistently and the carbonized areas were dark black. I am pleased with these outcomes, however I wish I would have smoothed the neck and feet into the form instead of using ribbons of details to “hide” the joints. It is super busy.
#4. Sculpture of girl with dog
- It is a rough sculpture of 2 forms on a slab. The largest parts of each form were pinched to keep the object hollow for drying time. The limbs were crudely attached to the pinched forms, and the details worked in. I flattened out my remaining clay and set the forms on it to transport back to class. At class, where I had left ALL of my tools, I was able to clean up the worst spots and attach the girl form and dog form to the slab properly. I added another slab underneath the entire piece just to be safe.
- I don’t always gravitate towards sculpture when working with clay. I usually make vessels. However, I enjoy sculpture work and it suited my mood once I was home with the clay and had realized ALL of my ceramic tools were back in Odgen. I was forced to work quickly and simply in order to avoid the need for tools. In my research for this class it is amazing how many times artists noted that limitations force one to be creative—and often these creative choices made by certain limitations allow for serious personal, artistic, and financial growth.
- An artist who was forced to fire in town and therefore had to be quite careful about smoky firings and reductions. She became an expert on how to achieve certain affects without using a lot of smoke.
- An artist who was forced to use her family kitchen as her studio. She was often interrupted when working. Her pieces require significant drying time with repeated scrapings—which is best for small amounts of work done throughout the entire day.
- An artist who was interested in putting light into her sculptures. This required hiding lighting fixtures with sculptural design elements. She would conference with an electrician with sketches, then alter the sculpture as she created the form to hold the required wires and bulbs for her work.
- I do not know yet how I will fire this piece. I know I do not want to raku it. I would like something rather dark, but moody. Perhaps a good crackle piece if I do raku it?
- The bisque was successful, however the top of the girl and the dog became separated from the overall structure. I decided to raku this piece, separately. I glazed everything with the clear crackle. During the reduction of the raku process, the bottom of the girl also separated from the structure. However, the unloaders were able to place all 4 pieces in the same can without touching. I let the can smoke for a very long time to encourage deep crackle. I glued the pieces to the slab structure with Elmer’s glue and am super pleased.
#5. Small bowl with texture.
- It is a simple slab bowl with a bit of asymmetrical shell texture curling up the inside of the bowl. I was inspired by Pam’s little plate collection and I wanted to do a couple of quick pieces.
- I want to pit fire or saggar fire this piece.
- The bisque was successful. I used the saggar method for this bowl. After giving the entire bowl a wash with copper sulfate, I re-hydrated sheets of seaweed and wrapped the bottom of the bowl with it. I placed water softener pellets in the bowl and then wrapped the entire package with tin foil. The pit firing was successful, however the salt pellets burned onto the bowl. I, again, should’ve documented better because I don’t know what side of the bowl had the most seaweed. I soaked the bowl in water for hours and finished it with paste wax. The dark black, pitted looking areas contrast with the rusts and ivory colors. The pellets created a pitted, eroded, almost toxic looking coloring that is texture-less (after soaking, scrubbing, repeating). That contrast is sort of troubling to me, it makes me feel uncomfortable. Abbie, my table-mate, liked this piece best out of my classwork.
#6. Another small bowl with texture.
- It is the same bowl mold used for #5 with a fabric texture asymmetrically pressed into the inside of the bowl. I used a string of beads to outline the flower pattern pressed in with the fabric.
- I want to pit fire or saggar fire this piece as well. They (#5 and #6) will be fun to really go wild with the alternative glazing.
- The bisque was successful. I used the saggar method for this bowl, again. I gave the entire bowl a wash with copper sulfate. I put a scrap of burlap soaked in copper sulfate iron solution inside the bowl. I put a little sawdust inside a foil saggar and placed the bowl on top and wrapped up the package. The pit firing was successful. The mauves are mostly around the rim of the bowl, I believe the huge scrap with iron kind of overpowered the copper sulfate wash. But the earth tones are lovely and bold. I finished with paste wax again.
#7. Another medium vase made from 2 molds.
- It was created using 2 molds to make the “body” of the vessel. It is a sphere form, so I rested the pot on its ugliest side and that became the flat bottom. I opened the top and used one of Pam’s tricks to finish the edge. She uses a damp cloth or cloth with slip on it and rubs the edge smooth. This prevents burrs.
- In my research I saw a couple of artists who were painting or etching geometric designs on their very round pots. It is an interesting optical illusion. I chose this spherical form to try this technique on. To save time I decided to only use 25% of the pot for the geometric design. I used scotch tape and a needle tool to create the design. In order to show value on the 3D design I used simple hatching with my tool. This would have been really successful with sgraffito.
- I intend to do some interesting things with relief and glazes with this piece to contrast the detailed section of the pot. I hope to let the scratched design speak for itself with just a little encouragement from glazes, but I want to thickly glaze the rest of the sphere.
- The bisque was successful. I decided to pit fire, using the copper sulfate wash around the entire bowl, except the detail area. I used the copper sulfate iron wash around the detailed area. I put pieces of wood inside the pot and let it pit fire. The firing was successful, the pot is full of color. However, salt pellets and perhaps plastic bag saggar residue was all over the pot. I soaked it for hours and finished it with paste wax—I used the wax around the entire vessel and gave the detailed area special attention. I did not use wax over the “hatched” detail areas. I have been enjoying playing with contrasts during this class…
#8. Platter with shape cut out.
- It was created by rolling out a thick slab, then using a mold to get a perfect circle before cutting. I smoothed the edges with Pam’s cloth technique, before asymmetrically cutting the heart shape out of the platter. I pushed holes close to either side of the heart for “stitching” I’ll do with jewelry wire after everything is fired. I created 3 smaller slab hearts: 1 to be stitched into the hole; a smaller heart with holes to possibly be dangled from the “hole heart’s” wire; and a last and smallest heart with a single hole to possibly dangle from the “dangly heart’s” wire.
- This piece was inspired by one of Pam’s platters with negative space. She carved out a rectangle shape, pushed holes through close to the sides of the shape, and then stitched small willow twigs onto the piece. It was lovely.
- I intend to pit fire this for sure. I want to keep it organic and away from metallic colors.
- The bisque was successful. I used copper sulfate wash around the entire plate and the 3 little hearts. The pit firing was not successful, the plate broke and I couldn’t find the smallest heart. However, the plate took the flame very dramatically. There is gorgeous contrast between the ivory and mauve. Of course the back is more wonderful than the front. I had my husband drill holes along both sides of the crack and I used wire to “lace” the two broken pieces into one. I wanted to add the heart and finish with beads and found objects. However, once I wired everything in-- the "stitched" pieces looked way too busy. I cut the ceramic heart out of the negative space and wired the hole just adding beads. (I would have left the hole completely blank, however the plate needed the additional wiring for support.) I only "dangled" one heart from the wire. Adding more just looked junky and frankly the entire piece was becoming too frustrating and forced.
#9. Feather vessel.
- This is a vessel that Pam created and pit fired. It had lovely mauves, peaches, and ivories. With all of the horsehair experiments, she was kind enough to sacrifice some of her vessels for further investigation. I was able to try using natural feathers to “brush” or “paint” onto the pot once it was taken out of the raku kiln. I probably let it cool too much before applying the feathers. I didn’t plan to do a pattern of any kind, I was simply trying new ways to use the feather as a tool—hence the random marks. The mauves burned off in the raku firing, resulting in a yellowish or dirty brown coloring. I used paste wax to finish the piece. It was super awesome of Pam to let me use the pot and then keep it!!!
Notes from Class
- Burnish with: metal spoons, smooth stones, plastic bags, strong sponges.
- Pam’s trick using cloth to smooth edges to avoid burrs.
- Pam’s trick of using tubes to punch holes into vessels (usually copper tubes). It cuts the clay instead of pushing the clay.
- Pam’s trick of putting vinegar into the slip directly to discourage cracks in clay.
- Kevin’s advice working with Blick Art Supplies to purchase things lower than the sale price as a teacher. Large ticket items like potter’s wheels, printing presses, etc.
- Kevin’s advice of sanding clay between leather hard and bone dry stage with a “limestone pad.” It is dark colored (usually black) and double sided. One can find it at hardware stores.
- Erin's advice of using a “diamond sanding tool” to sand clay after it has been bisqued. Just sanding the bottom so the unglazed area doesn’t scratch furniture.
- Using a metal can (soup can, etc.) to “shave” or “trim” spheres. Place the sphere (which must match the size of the can) on the can and slightly turn it to shave and trim odd parts off.
- Can raku after pit firing.
- Do not use glazes for a pit firing.
- Wear gloves with chemicals and glazes because they are toxic.
- Copper sulfate and water wash= mauve and pinks over white clay. 1 coat.
- Copper sulfate iron and water wash= browns and earth tones over white clay. 1 coat.
- Clear shoe polish, butcher’s wax to polish or buff pots.
- I purchased Johnson's Paste Wax at Lowe's. It smells and behaves like shoe polish. It definitely deepens the colors like Pam said it would. It dries clear.
- Several students were spraying their pots with clear acrylic paint. Some used gloss, some used satin. I prefered the satin, but haven't tried it on any of my pots.
- Pit firing
- 6” of sawdust on the bottom of the pit, then shake 4 or so cups of salt over the sawdust (Pam used canning salt), then sprinkle copper sulfate (crystal form) over salt.
- Start with a tall, stable vessel and place it in the center of the pit. Surround that vessel with tall, thin wood. Layer additional pots around the wood. Repeat.
- Keep bowls in the same area, platters in the same area, etc. Start with large pieces towards the center and gradually get smaller in size as you work out. Keep using the long, thin pieces of wood between the pots so no clay touches other clay. Place saggars around the very outside “layer.”
- Place small bits of wood inside bowls and vessels.
- Don’t use wood with paint on it—creates “bird poop” marks on vessels.
- Hard woods burn with the best color effects.
- Once loading is complete, cover all the clay exposed with wood and then sawdust. IN THAT ORDER.
- Place large pieces of wood around the outside layer of the top of the pit. Cover entire pit with a layer of hay, then dried yard waste (willow branches, pine needles, etc.). IN THAT ORDER.
- Lay crumpled newspaper around the outside layer of the top of the pit and light with a torch.
- Cover the entire pit with a lid.
- When unloading.
- Be careful to unload from the outside as pots will have collapsed onto each other because the combustibles have been burnt.
- Be careful of heat, embers, ash, etc.
- Wash vessels with water, scrub pads, soft brushes.
- If there is residue from chemicals (salts will sometimes leave residue), let the pots soak in a tub of water. Pam leaves them in for days, changing the water periodically.
- Let pots dry completely before using wax or sprays. Pam prefers clear acrylic aerosol. I would assume she uses a flat or satin sheen.
- I really enjoyed the edge work I saw during this class. Kevin (teacher from Ankeny, elementary) used it on his box, Pam used it on several vessels.
- I also enjoyed the feet I saw Pam use on several pieces. The elevated vessel is so elegant.
- Tall, thin pieces are the best for pit fires. The flames lick up the piece. Spheres also do well, Ryk believes the form sucks the flames around the vessel.
- Allison (teacher from Des Moines, elementary) used a saggar method which had the pot, surrounded by combustibles, in a paper bag, which was then partially covered with tin foil. It turned out most impressive.
- Etsy--- truecolorstiedyeart
- [email protected]
- Erin (teacher from Des Moines) used balsa foam to create stamps for clay.
Adaptation to the Classroom
There are so many things I will be able to transfer from Pam’s class into my curriculum at school.
There are so many things I will be able to transfer from Pam’s class into my curriculum at school.
- I hope to do more of the mold work with duplicate forms. Right now I don’t have 2 of any appropriate mold, so the students can’t make both sides at the same time. I have been constantly on the lookout for these molds since I took Pam’s class last year. The forms are interesting, can be interpreted many different ways, and can be altered various ways. My students love them.
- I hope to do more burnishing. Again, these are all time issues. It is difficult to have the clay at the precise stage for burnishing for several days, when I only have the kids for 45 minutes every day. I do have several students who use their study hall periods for additional art time, they might be able to burnish effectively. At least the tools are cheap!
- I totally fell in love with Pam’s platter-mixed media piece (a large, round plate with willow woven/stitched into the negative shape of the platter). I want to introduce more of those to my students. I wish I had taken more pictures of those in her studio. There are endless ways for students to play with that idea. Even if these don’t look great with glazes, we can experiment with under-glazing, the amazing englobes I have, acrylic paint, etc.
- I don’t know if my students will enjoy naked glazes. They are all about the glossy, super bright, or super metallic glazes. They love experimenting with layering different glazes, but the moment I talk to them about rubbing glazes off or just scumbling across the tops of textures for contrast… the kids fall apart. Of course they love raku, and my Art Club has experienced raku firing. But we cannot do this often—it’s basically an annual field trip opportunity. I do think some of the kids will like the pit fired look. I am going to try it at home with Heath and perhaps we could at least do it with the Art Club. Since my kiln is in my actual art room it makes an alternative firing inside my kiln (saggars) pretty much impossible.
- I want to do a couple of example pieces this summer with a bunch of texture and added layers/edges (see Class Notes: Kevin and Pam’s techniques). I want to encourage my students to use these techniques more. They are constantly obsessed with smooth objects.
- Concerning smooth objects, I will be able to introduce smoothing and finishing with cloth rags. This was a very effective technique that Pam taught me. The students might also enjoy the wax. I’ll have to see what kinds of residues these leave on tables, paper, etc.
- I want to introduce a steel nail lesson into my elementary classes, and let the high school students use them if they wish. I just need to test an example in my kiln to see how much they smell. It is a really interesting addition to ceramics.
- I will be more effective firing clay beads with the methods I learned from Erin and Pam. They used a clay cylinder (no top or bottom) with holes punched into it to slide the beads onto steel wire and then through the holes in the cylinder. If multiple holes are placed throughout the height of the cylinder, you can do several “levels” of beads. The glaze firing is trickier—you can’t let the beads touch each other of course. Steel washer separators or light glazing as tips were suggestions for this problem.
- Using copper tubes or straws to create holes in clay is a brilliant technique Pam taught me. Then the clay slab doesn’t buckle around the “stick” when pushing or forcing the clay hole out of the slab. The tube/straw “cuts” through the clay slab instead of pushing. This will be super useful for all grade levels.
