3 PIECES OF POTTERY (30 HOURS)


#1. Slump Mold Platter
I really wanted to get some good slump mold pieces this year, and Kirk had new molds! My main goal was to keep an eye on them drying in the sun so they didn't warp. I was pleased with this piece. The form and glaze work all turned out great!
*I used Michigan Patina on the platter and Midnight Luster on the handles.


#2. Pattern Bottle
It was another goal to try several patterned bottles this year. I wanted to keep them small so they would dry fast and ensure they get raku fired. The photograph doesn't do the color justice-- it is a striking aqua blue.
*I used the Aqua (small containers) on the bamboo texture, and Piepenburg Red-Bronze on the rest of the pot. I tipped the top and bottom in Orange (small containers). The Aqua turned out great! The Orange was more like a brown, disappointing.


#3. Pattern Pitcher
I made one of these last time I took Kirk's class and it was so successful I wanted to try it again. I think this will be very successful for my students, plus it has a good example of the Carrot Handle. The colors turned out brilliant, again, the photograph doesnt' do it justice.
*I used Midnight Luster (which is Diane's FAVORITE GLAZE) on the pitcher and Firedance on the handle.


#4. Pattern Bottle
It was nice to knock out a second one of these. My photography didn't do the coppers in my pots justice, as I've mentioned.
*I used Blue Dolphin (matte) on the indented textured parts of the pot, then Copper Flash (matte) over the the textured areas, then Piepenburg Red-Bronze over the top/side coils.
#5. Cylinder Pot
A few of my fellow classmates called these the Mad-Hatters Pots. They were just silly and fun, tons of textures that I borrowed from several people. This first pot is really large. I made the form and then took out the mold before I added the texture... which didn't go very well. Physically stamping the pot changed the perfect shape and lid allignment. I made adjustments when I did the other 2 "mad-hatter" pots. I need to scrub more of the black off the main vessel so the White Crackle shows through more.
*I used black underglaze for the textured bits, then wiped the top off, then used White Crackle over the top. I used Midnight Luster for the "flower" and coil details.
#6. Hanging Pocket Pot
I've done these at school many times, but I just wanted to make one and get it raku-fired because of the pretty colors. This turned out perfect-- I totally kept my eye on in on the porch, I was scared it would warp in the sun. I brought it inside several times just to make sure it would dry flat.
*I used Michigan Patina on the top half and Midnight Luster on the bottom half.
Kitty kept jumping up on my photography "center." Somehow, she always knows what's important and jumps up on that work. It could be a pastel sympathy card, a painting, a colored pencil birthday crown... it doesn't matter. She is the queen of the house and will do exactly what she wants, when she wants.
#7. Slump Mold Platter
This was the first slump mold I did in class. I picked the form with the scalloped edges. It worked perfectly, bisque fired perfectly, but then warped and cracked in the raku firing. I wasn't in love with the way the glaze turned out so I guess it's cool that this is the piece that cracked. A couple of my classmates thought the matte glaze made it look antique and artifact-y. But again, I wasn't impressed.
*I used Copper Flash (matte) on the front and back of the platter, and Aqua (small container) on the heart texture details.


#8 and #9 Pattern Bottles
These are tiny bottles that I made at Kirk's last class. They are only like 2" tall. But I wanted to get them glazed and into the raku firing. I wish I had pushed the glaze into the textured bit and let the rest just fire black, but I got glaze happy haha.
*I used black underglaze on the textured bits, then Piepenburg Red-Bronze on the upper bits, I used Aqua (small container) on the raised coils and little squares.
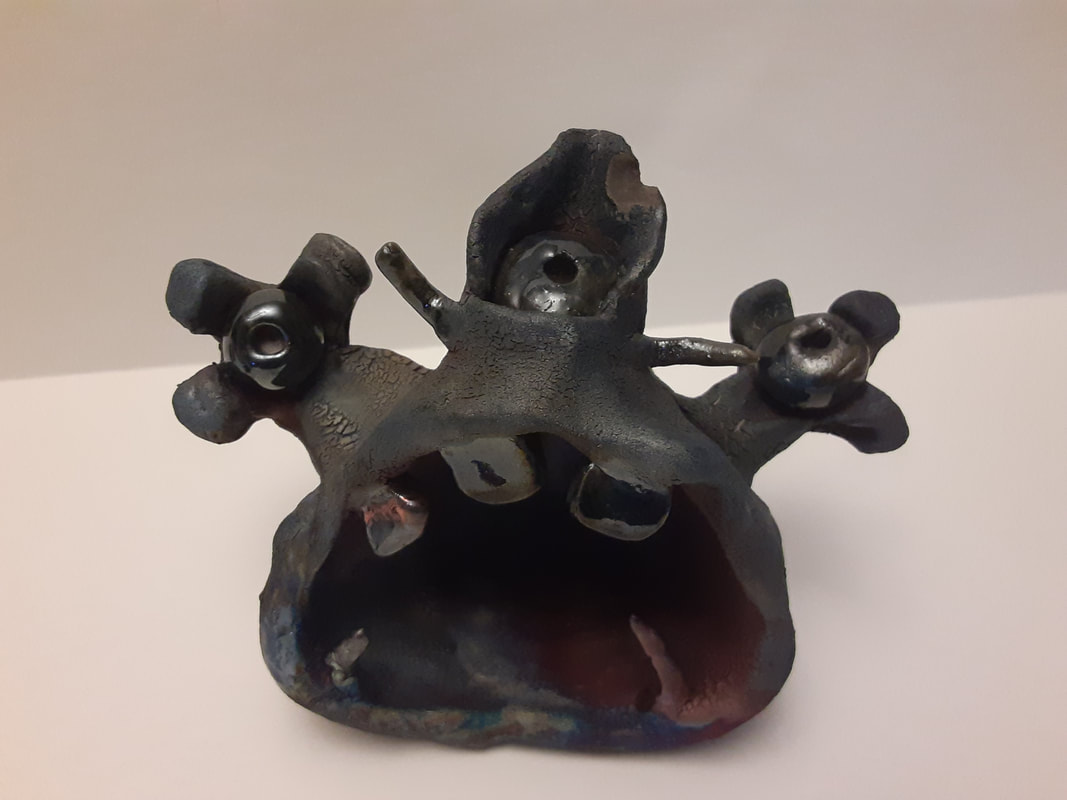
#10. Pinch Pot Monster
This is an example I did for 5th graders, it is a pinch pot challenge that requires a pinch pot structure, at least 1 eye and at least 1 tooth. I knew it would look amazing raku fired. I didn't pay attention to my glaze choices and am disappointed that it's so dark. I should've used a lighter matte glaze.
*I used Blue Dolphin (matte) on the entire body, I used Michigan Patina on the eyes.
#11 and #12 Cylinder Pots
I did these on our day off. I knew they'd be too wet to get fired this year, I'll raku them next time I take the class. I changed my strategy on these the 2nd and 3rd time around. I textured the slab BEFORE I wrapped the cylinder mold. This way I didn't alter the form putting the texture in. It was way more successful. These are smaller than the #4 version, but width and height.
I did these on our day off. I knew they'd be too wet to get fired this year, I'll raku them next time I take the class. I changed my strategy on these the 2nd and 3rd time around. I textured the slab BEFORE I wrapped the cylinder mold. This way I didn't alter the form putting the texture in. It was way more successful. These are smaller than the #4 version, but width and height.
JOURNAL ENTRIES AND REFLECTIONS (20 HOURS)
General Notes (New materials, new ideas, new instruction, new details, new quotes, etc.):
Notes Specific to People:
- Decreased oxygen equals more coppers. That's why Kirk only fills the trash cans 1/2 way. He leaves the previously expelled ash in the can so only 1/2 the can is available for new leaves/sawdust/etc. This way there is less oxygen to burn up, which means more coppers. Kirk loves coppers.
- Bill van Gilder is an artist Kirk noted:
- https://www.vangilderpottery.com/
- https://www.vangilderpottery.com/
- Warren MacKenzie is another artist Kirk noted:
- https://www.warrenmackenziepottery.com/
- Kirk's personal choice is Continental Clay because of customer service. This would be the company he uses as an artist, not the company he uses for school.
- Kirk bought 1,000 lbs of clay for our 2 day class this year. In the past we've used all the clay before Friday, this year I don't think we went through 75% of the clay purchased.
- Textured pots ARE NOT FOOD SAFE.
- "Food equals smooth," Kirk says.
- Kirk advises not to combine edges, meaning we should choose either smooth (rolled, textured, softer) or cut edges.
- Clay shrinks at least 12% in the drying and firing process.
- Patterned slabs (pots made from using 2 cut-out-patterns, then a slab for the bottom) need to be a little bit drier, not leather hard, but a little bit drier (especially if they are large) to assemble.
- Beveling the edge will help them assemble easier.
- Pulled handle:
- Start with a long coil, get it wet with slip and pull down so gravity aids the process.
- Indent it as you pull so there are ridges
- Create an arch with the coil, set it on a table edge for 20 minutes to dry. If you can still see your finger prints on the coil, it is still wet.
- Cut and trim and put it on the pot.
- Start with a long coil, get it wet with slip and pull down so gravity aids the process.
- Vases/coffee mugs don't need a foot-- plates/bowls need a foot.
Notes Specific to People:
- Help/advice with screen printing: Kirk, Diane Kunzler ([email protected]), Amber Carlin ([email protected])
- Help/advice with kintsugi ceramics: Kristen Payne ([email protected]).
- It's called Kintsugi , or Kintsukuroi , literally golden (“kin”) and repair (“tsugi”). Kintsugi is the process of repairing ceramics traditionally with lacquer and gold, leaving a gold seam where the cracks were. The technique consists in joining fragments and giving them a new, more refined aspect.
- It's called Kintsugi , or Kintsukuroi , literally golden (“kin”) and repair (“tsugi”). Kintsugi is the process of repairing ceramics traditionally with lacquer and gold, leaving a gold seam where the cracks were. The technique consists in joining fragments and giving them a new, more refined aspect.
- 2 pinch pot series: Wendy Stansberry ([email protected])
- "Potheads"-- 1 pinch pot for the head turned open, 1 pinch pot for the "body" turned upside down. Facial features, arms, etc. are added at the end.
- "Potheads"-- 1 pinch pot for the head turned open, 1 pinch pot for the "body" turned upside down. Facial features, arms, etc. are added at the end.
- Amber Carlin is the jeweler ([email protected])
- Amanda Grau knows about the weaving guild ([email protected])
- Jenny and Amanda are friends, went to undergrad together and work for the same school district ([email protected])
- Stehapnie Nelson is a photographer and the girl who gave me the Pride pin ([email protected])
- I want to try the tri-pots (the bottles using the patterns that have 3 sides). They can cave in or push out. Maggie did one for reference.
- I also want to try the heart shaped pockets using scraps. They had little pocket fronts (more than 1) instead of just 1 big pocket front.
